Hollow wooden kneeboard

What works & what doesn't and in what type of conditions. Got a "secret" only you and your shaper know???? Post it here... we can keep it quiet ;-)

Moderator: Moderator

User avatar
tomway
Ripper (more than 100 posts)
Posts: 270
Joined: Tue Nov 30, 2004 6:21 pm
Location: South Sulawesi
Contact:

Hollow wooden kneeboard

Post by tomway »

I'm just starting my first hollow wooden kneeboard and I thought I'd document the process here. I've thought it out in my head a few times, collected notes from swaylocks and learnt from the mistakes I made on my first hw standup board.

I'd be grateful if you could give me criticism and advice as the process advances as I'm neither a chippy or a shaper so there are bound to be times when its obvious to eveyone but me that I'm screwing up!

Before I start, credit where credit is due: Paul Jensen on swaylocks (who at least) revived the hollow wood surfboard (check out hollowsurfboards.com)... and Daniel Hess who has refined the concept to make the boards contemporary (www.hesssurfboards.com). These are all their ideas that I've nicked.

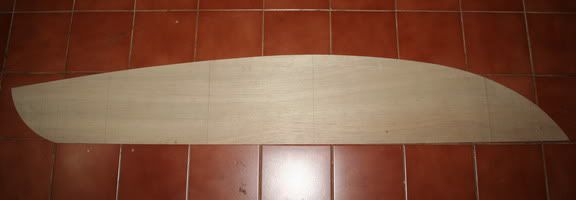
So here's stage one. The planshape is a slightly stretched (5'8") version of the liss fish in the surfboard design and construction book. The finished board will be (approx) 5'8" x 22 1/4" x 2 1/2"

Image

I'm going to start by building the rails and working inwards from there.
My first hws was really heavy, about 8kgs (!) and almost all this weight was in the rails (the rail bands were 1 1/2" thick and corky shape). The new rails will be built up out of 8 x 1/8" strips of wood, so the rail band will be only 1" thick. I'm also going to roll the deck alot so I can get the rails thinner. I hope this doesn't affect the characteristics of the fish negatively.

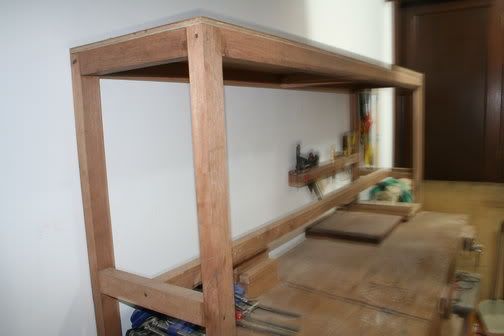
To make the rails, first I've made a glueup jig, which is basically the planshape of the fish minus 1". I've cut the outline onto two pieces of 1/4" ply and glued the two pieces together with 8" spacers between them to make a kind of box:

Image

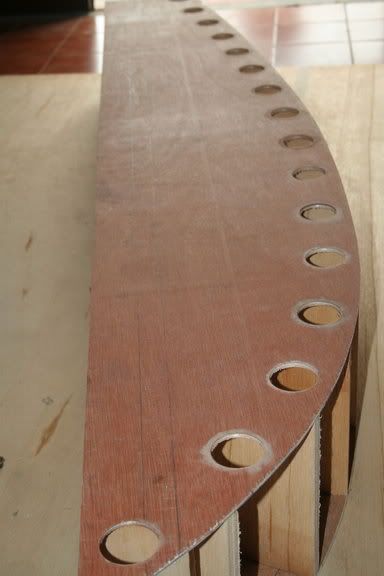
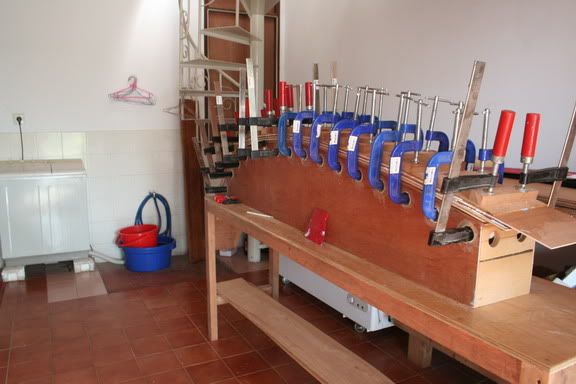
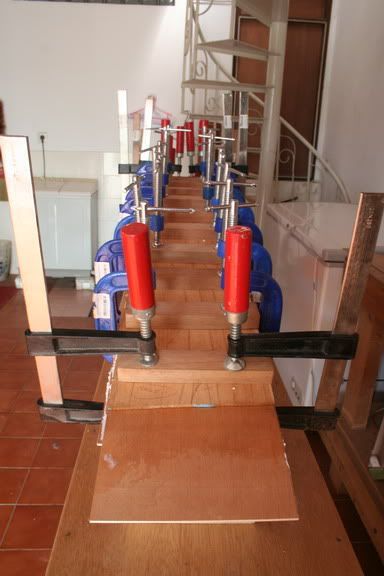
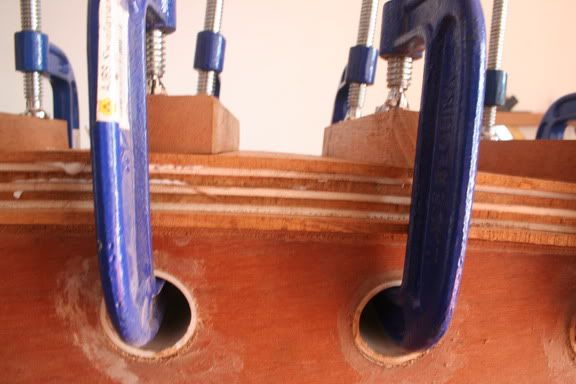
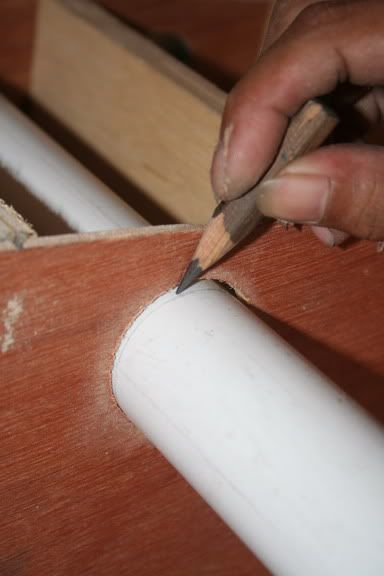
You can see I've cut holes into the sides to locate the (many many) clamps that will be needed during the rail glueup. The ply is only thin so I've also glued some pvc pipe through the clamp holes to try and protect the jig from the clamps jaws.

Image

That's it so far.
I hope this isn't out of place in this forum or on this site. Seeing as it's going to be a kneeboard I thought I'd get more appropriate feedback here than on other sites. Maybe it will be interesting to some people. Feel free to tell me if I'm wrong!

Cheers,
Tom
User avatar
boards_and_fins
Local (More than 25 post)
Posts: 73
Joined: Tue Mar 07, 2006 6:24 pm
Location: Southern California

Post by boards_and_fins »

Far be it from me to comment on your shaping skill as I myself have none, but that board looks like it is going to be killer. Please keep posting your progress here, I, for one, totally want to see how it works out.
your mom goes to college
surfhorn
Legend (Contribution King!)
Posts: 2261
Joined: Wed Jul 02, 2003 6:42 am
Location: Aptos, California
Contact:

Post by surfhorn »

You go, Tom! Kneeboarders are not part of the herd. Follow your own thoughts and enjoy the ride.

I'm sure everyone on this site will be waiting for each and every update.

Much luck with your little fishie.
kbing since plywood days
User avatar
Headwax.
Legend (Contribution King!)
Posts: 610
Joined: Thu May 11, 2006 2:16 am
Contact:

Post by Headwax. »

good stuff Tomway,

keep posting, very interesting :idea:
User avatar
tomway
Ripper (more than 100 posts)
Posts: 270
Joined: Tue Nov 30, 2004 6:21 pm
Location: South Sulawesi
Contact:

Post by tomway »

Great. Thanks for the encouragement :)

So next I decided to make a little bench to hold the jigs as I put the thing together. Needed something small enough to walk around in my small workshop/freezer/washingmachine space.

Image
The wood the bench is made from is called kamper. Don't know what the western name for it is (camphorwood???). It seems to be readily available here as there is a shop on every street making windows and doors out of it. I'm told it's exported in that form too.
One of my concerns here is, where does the wood come from? Is it legally cut? I often ask the street suppliers, but noone knows, and noone seems to care... as long as they get it cheap and can make a profit to feed their families.

Next job was more fun. I'm always looking for light-weight woods and I found some planks for stuff called 'jampinis' in bali a few weeks ago. Again, I don't know the western name for this. I bought it from a woodyard with a kiln and they guarantee all the wood they sell is legally felled (but who knows). Also jampinis apparently grows quickly and locally in quantity. The grain pattern is not unlike teak but a much lighter colour (creamy brown) and with some small knots like pine.

The wood yard could only cut the wood into 7mm thick planks and for the rails I need planks which are around 1/8" (3mm) so they need to be thicknessed down. Quite alot of waste but can't see a way round it.

Image

You can see the little hobby bench thicknesser is on the floor. My javanese mate, Eko, came round to help me and he refuses to work at the bench. Like most Indonesians he seems to favour a low centre of gravity when working. As a kneeboarder I can appreciate that!

After this I'm going to glue all the 8 rail strips together on the jig. Will probably use white glue. I haven't got any experience laying up wood like this so I hope white glue is good. Don't have much choice anyway!

Tom
User avatar
Headwax.
Legend (Contribution King!)
Posts: 610
Joined: Thu May 11, 2006 2:16 am
Contact:

Post by Headwax. »

try and get exterior grade white glue


two schools of thought on excess drips:

1) wipe off imeddiately with damp cloth
2) wait till dries then chisel off carefully

(data from making cabinets, not boards)

cheeze
User avatar
ross
Legend (Contribution King!)
Posts: 368
Joined: Mon Nov 08, 2004 7:38 am
Location: centralcoast nsw aust

Post by ross »

hey tomway,
this is interesting.i'm keen to see the project unfold. i've been a chippie for near on fifteen years, but i'd say any input i could add, you would have covered seeing you've already built one.
the timber your using is almost certainly from rainforests and looks like maple.hard to tell from the shot.look at it this way,at least your paying the indonesians directly for their timber.
Here in Australia our renovation/investment (greedy) property set can't get enough hardwood decks and think nothing of paying good money for Merbua for their ivory towers.No-one seems to question why all of a sudden we have acsess to once rare timbers.i'am in this industry and i'm racked with guilt every time i use it :oops: :cry: .this doesn't apply to your situation obviously,i tend to rant at times.
with your glue choice,do you mean PVA(poly vinyl acetate). Epoxy might be a better choice, if you could get your hands on it that is.
give some thought to roughing up your timber before laminating it, with some 80 grit snad paper so the glue "keys" into the sufaces.and if possible apply glue and press the layers together and slide them back and forth before clamping to eliminate air particles and to create suction between the layers.
the other consideration,although possibly to late for you is drying the timber before construction.most timber your getting is probably freshly milled and is as a result suseptable to shrinkage.hopefully because you are in indo and its constantly hot and humid the timber wont expand or contract.moisture in the timber is also going to affect the end product if your planning on glassing it.
enjoy yourself building it.
be safe withyour tools.
and send us some pics of yourself surfing it on that little righthander of yours. 8) :D
ross
User avatar
tomway
Ripper (more than 100 posts)
Posts: 270
Joined: Tue Nov 30, 2004 6:21 pm
Location: South Sulawesi
Contact:

Post by tomway »

Headwax and Ross: thank you for the post. Ross - I know what you mean about merbau, seems to the wood of choice at the moment. There's a number of yards in town that are milling merbau 24/7. Absouloutely beautiful, huge trees with long lengths of straight bole. The yard owners tell me (unashamedly) that it's being lifted straight out of west papua... and you can imagine how well policed the timber trade is there. And to think that most of those huge pieces of lumber are sawn into floorboards for decking ?:evil:

Anyway, today's work. On my way home last night I stopped off at a few 'toko bangunans' (kind of do it yourself shacks you find along the road here). In the corner I saw a sheet of 3mm plywood and on closer inspection noticed it had a paper white core. I thought it would make a nice contrast with jampinis for the rails so I took it home and cut it into strips. Roughed it up with 80g earlier and laminated wood for the first rail together. Squeeged white glue (pva, Indon's finest 'Lem Fox' brand) on with a plastic spreader and then slid the pieces up and down against each other as recommended. This definitely helped and it was quite difficult to peel the plys apart even while the glue was fresh and wet. Then put them on the jig and started clamping from the centre of the rail to the ends.

Image

The width of the planks is about 8". Seeing as the nose rocker of a fish is about 4" I reckon if I'm careful I'll be able to cut three (starboard) rails out of this lamination and three port rails out of the next. Should keep me going for a little while and allow a bit of experimentation.

Image

30 odd clamps! You can see the contrast of the plys that will make up the finished rail here.

Image

Got to make a rocker jig next. I'm going to try and cut the rails out with a router following a rocker template. Still not sure exactly how to make the jig. Drawing the rocker (bottom and deck) for a centre stringer is easy enough, but drawing one for 1" in from the rail line is damn confusing. :? Time to get the calipers out and start measuring old boards.

Tom
frankfqr
Ripper (more than 100 posts)
Posts: 203
Joined: Sun Feb 13, 2005 8:33 pm
Location: CA

hollow wooden

Post by frankfqr »

Good work tomway. I get this picture of supporting your favorite board comfortably perpendicular to your best jig material. And then using your obvious talent to construct a guide that will travel the distance of the overall curve but still line up at different locations; see if you come up with a consistent reference point. If anything is accomplished you will at least get a better idea of the of the flow and curves and transitions in more detail. Good luck. Thanks for the post.
User avatar
tomway
Ripper (more than 100 posts)
Posts: 270
Joined: Tue Nov 30, 2004 6:21 pm
Location: South Sulawesi
Contact:

Post by tomway »

:idea: That's a good idea frankfqr! Cheers :)
User avatar
Headwax.
Legend (Contribution King!)
Posts: 610
Joined: Thu May 11, 2006 2:16 am
Contact:

Post by Headwax. »

mate, your an artist!!!

keep on with the pics

re artists -friend of mine (a kneelo) web site

http://www.members.westnet.com.au/surfe ... Birch.html
User avatar
Man O' War
Legend (Contribution King!)
Posts: 555
Joined: Tue Apr 15, 2003 9:57 pm
Location: Miami FL

Post by Man O' War »

T, this is amazing. Where is Jon Manss? I'm so glad you're documenting this.
User avatar
Jon Manss
Legend (Contribution King!)
Posts: 504
Joined: Sun Jul 27, 2003 5:00 pm
Location: Santa Cruz

Post by Jon Manss »

I'm here Mark and I've been watching Tomway's progress, so far he is on course for his steps. Tomway do I see this right, Your planning to shape the rail out of your bent lamination that is roughly 1 inch thick. I'm not sure I see the whole picture on the stock you are creating for the rails. You can't go wrong with the yellow or pva glue for laminating, as long as it is an exterior grade. What are your tools for shaping and I gather you don't have a band saw for resawing thin strips. Jon
PS
I Have read over your plans again and what I get is your going to take your 8" bent stock and profile the rocker to that. Now your problem is getting the right profile an inch away from a rail. Have you thought of getting your body of the board roughed out to help aid with the proper rail profile. Do you plan on having any V in your tail? I don't know what should go first the body or the rails. I'm sure you have thought of this and I would like to hear of the step sequence you have developed. Does make sense?
User avatar
tomway
Ripper (more than 100 posts)
Posts: 270
Joined: Tue Nov 30, 2004 6:21 pm
Location: South Sulawesi
Contact:

Post by tomway »

Hi Jon, thanks for your interest, like I said before I've got more enthusiasm than skill when it comes to working with wood so your ideas would be very welcome :D

My tools, of the powered variety: a benchmounted (small) table saw, the little thicknesser you saw in previous photos, power planer (twin blade), sander/polisher, a plunge router, a trimmer, a drill and a grinder. No band saw unfortunately. Among my hand tools I've got a jack plane and block plane, various saws and chisels and a sheet of tempered glass and lots of strips of different grade glass paper for sharpening.

Your guess as to how I plan to put the board together is right, sorry I haven't been more lucid :oops: There are two reasons that I'm starting with the rails. The first is that I'm not planning on using a rigid stringer. I want the rails to act as a perimeter stringer, and I want to try and make the thing less stiff and retain the natural flex of the wood. The second is weight. When the rails are finished I plan on routing them out from the inside. If I made the inner frame of the board first and glued the rails on piece by piece afterwards (like Paul Jensen's method) I wouldn't have room to get a router in.

This outside-in approach is what Daniel Hess seems to be doing. His brain is much bigger than mine though and he talks about 'using a series of molds' to make his rails. I'm sure this would be more accurate and less wasteful than what I'm doing cutting rails out of 8" of stock.

So at the moment I've finished the template for the rail profile (I copied an old board as suggested by frankfq in a previous post and stretched it a bit as this board is longer) and am half way through routing out the rails... very very slowly. Will post pices tonight.

As for the bottom contour. Once the rails are finished and attached to each other I'll make the interior frame. Not sure what material I'll use yet. The cross pieces of the frame will determine the bottom contours (probably a touch of concave to flat through the fins as suggested by Bud in previous fish posts).

Looks like my decision to stay at home this weekend and work on this was a bad one - Bali's just been hit by the first big swell of the season :cry: 6 ft+ and it looks like outside corner was breaking yesterday (www.baliwaves.com).
User avatar
Jon Manss
Legend (Contribution King!)
Posts: 504
Joined: Sun Jul 27, 2003 5:00 pm
Location: Santa Cruz

Post by Jon Manss »

Jon Here
I'm no expert so please take my advice with a grain of salt. The use of a trim router bit is right on for template work. I am still not sure as to how you plan to join the rails to the body. But that is no matter right now I was thinking if you had the Body semi built it would help in the profile of your rail project. Another aproach is to sacrifice the model board and slice the one inch edge to get an idea of th rail template, but with patience and a felt pen you can get an image of that rail measurements without destroying a board. Wood work 101 says whenever possible cut your joints before shaping or rounding surfaces. This gives you the advantage of flat and square surfaces to aid you in your joinery. Of the tools you have mentioned the grinder will work the fastest and can get the project into the garbage pile just as fast, so be careful. Your hand planes, if sharp, are actually a very good choice on convex surfaces , like a rail. Just make sure you work the down side of the grain or from the center out to the nose or tail.
Your project is fantastic and to think you plan on riding this in Bali is awesome. Your jig has taught me a few things. I wish you all the success and luck needed to complete this. One last thought, when it get's tough or a problem arrives that can't be solved. Drop every thing , go surf or sleep it off. Let it go and come back fresh the answer will follow. Cheers Jon
Post Reply